AWS Lambda ChatGPT Limerick Clock

AWS Lambda ChatGPT Limerick Clock

Why?
What?

- A battery-operated Rasperry Pi Zero W with e-ink display. You can find the details for that build in the Installation section of this pwnagotchi site.
How?

Add a Billing Account to OpenAI


Do the deed and click Submit 🙂

Create an OpenAI API Key
Now click API keys on the left and click Create new secret key


Create & Test a Local Python 3.7 Limerick Script
import os
import openai

openai.api_key = 'paste-your-key-here'
response = openai.Completion.create(model="text-davinci-003", prompt="What are the three laws of robotics", temperature=0.6, max_tokens=150)
print(response.choices[0].text)
Before running the code, make sure you install the openai Python library with “pip install openai”. Once we have done that, running the code results in this output:
1. A robot may not injure a human being or, through inaction, allow a human being to come to harm.
2. A robot must obey the orders given it by human beings except where such orders would conflict with the First Law.
3. A robot must protect its own existence as long as such protection does not conflict with the First or Second Law.
import openai
import time
from datetime import datetime

def askGPT(text):
    openai.api_key = "paste-your-key-here"
    response = openai.Completion.create(
        engine = "text-davinci-003",
        prompt = text,
        temperature = 0.6,
        max_tokens = 150
    )
    return print(response.choices[0].text)

def main():
    now = datetime.now()
    myRequest = "Please tell me a limerick about the time " + now.strftime('%I') + ":" + now.strftime('%M') + " " + now.strftime('%p')
    print("myRequest: ", myRequest)
    askGPT(myRequest)
    print('n')

main()
myRequest:  Please tell me a limerick about the time 06:53 PM


At half past six in the evening
The sun was still out and gleaming
But soon it would set
And the sky would be wet
And the stars would start their light-beaming
Create a Python 3.7 Lambda Function
Okey dokey. We now have Python that does what we want it to do – tell a time-based limerick. Let’s create an AWS Lambda Python function with that code. First step: Create a shell Lambda Python function.
Login to AWS, search for Lambda, and jump to the Lambda page.
Click “Create function”

Choose the Hello World Python 3.7 Blueprint, name your funtion, and click “Create funtion” at the bottom of the page.


Choose the Hello World Python 3.7 Blueprint, name your funtion, and click “Create funtion” at the bottom of the page.


Now, let’s modify this blueprint function by inserting our working ChatGPT code
import json
import datetime
import openai


print('Loading function')


def lambda_handler(event, context):
#    print("Received event: " + json.dumps(event, indent=2))
#    print("value1 = " + event['key1'])
#    print("value2 = " + event['key2'])
#    print("value3 = " + event['key3'])
#    return event['key1']  # Echo back the first key value
#    #raise Exception('Something went wrong')
    openai.api_key = "paste-your-api-key-here";
    now_var = datetime.datetime.now();
    then_var = now_var - datetime.timedelta(hours=4)
    hour_var = then_var.strftime("%I");
    minute_var = then_var.strftime("%M");
    ampm_var = then_var.strftime("%p")
    response = openai.Completion.create(
        engine = "text-davinci-003",
        prompt = "Please tell me a limerick based on the time " + hour_var + ":" + minute_var + " " + ampm_var,
        temperature = 0.6,
        max_tokens = 150
    )
    return (response.choices[0].text)
Test Event Name
BlogEvent

Response
{
  "errorMessage": "Unable to import module 'lambda_function': No module named 'openai'",
  "errorType": "Runtime.ImportModuleError",
  "stackTrace": []
}

Function Logs
START RequestId: 9adbc452-ddaa-4630-b3ac-1e7490b0bb61 Version: $LATEST
[ERROR] Runtime.ImportModuleError: Unable to import module 'lambda_function': No module named 'openai'
Traceback (most recent call last):
END RequestId: 9adbc452-ddaa-4630-b3ac-1e7490b0bb61
REPORT RequestId: 9adbc452-ddaa-4630-b3ac-1e7490b0bb61	Duration: 1.80 ms	Billed Duration: 2 ms	Memory Size: 128 MB	Max Memory Used: 36 MB	Init Duration: 112.52 ms

Request ID
9adbc452-ddaa-4630-b3ac-1e7490b0bb61


I then clicked “Create”. The creation process takes a few minutes. Once the instance is created fully, click “Open in Cloud9”


ec2-user:~/environment $ python -V Python 3.7.16 ec2-user:~/environment $ mkdir python ec2-user:~/environment $ pip install openai -t pythonec2-user:~/environment $ zip -r layer.zip pythonec2-user:~/environment $ aws lambda publish-layer-version --layer-name blog-layer --zip-file fileb://layer.zip --compatible-runtimes python3.7 --region us-east-1 { "LayerVersionArn": "arn:aws:lambda:us-east-1:21[SNIP]7716:layer:blog-layer:1", "Description": "", "CreatedDate": "2023-04-19T14:39:34.555+0000", "LayerArn": "arn:aws:lambda:us-east-1:21[SNIP]7716:layer:blog-layer", "Content": { "CodeSize": 3294785, "CodeSha256": "fH4qojoKP7Ab+TUq3OV/QdVHsX2z[SNIP]j6uRThDU=", "Location": "https://prod-04-2014-layers.s3.us-east-1.amazonaws.com/snapshots/21[SNIP]7716/blog-layer-60e4ab4[SNIP]495?versionId=qHhUe5v[SNIP]eNFSb&X-Amz-Security-Token=IQoJb3[SNIP]0b583b42a" }, "Version": 1, "CompatibleRuntimes": [ "python3.7" ] }

Let’s go add that later to our OpenAI Lambda function and see if it works now
Jump back to Lambda Functions, choose the function and click “Layers” then “Add a layer”

 Choose “Custom layers”, choose your uploaded layer from the drop-down, choose the version from the drop-down, and click “Add”


ec2-user:~/environment $ curl -s  https://q4t[SNIP]hddzl.lambda-url.us-east-1.on.aws/


At 11:34, I'm feeling quite free,
To go out and explore, you see.
The sun is so bright,
It's a beautiful sight,
Let's go out and make some memories!
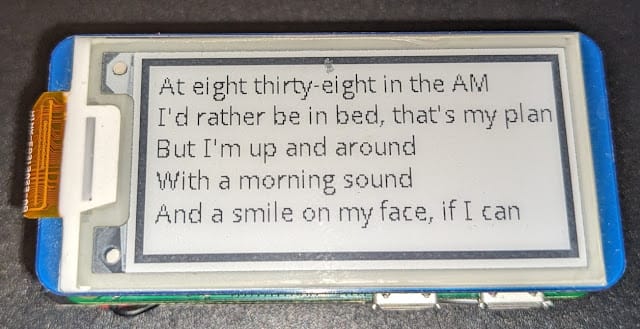
Display Limericks on Your Raspberry Pi Zero W Limerick Clock (WIP)

I’ll just lay out the software pieces. All the hardware pieces (Raspberry Pi Zero W, e-ink display, battery) are described in the Pwnagotchi repository. LMK if you have any issues.
E-Ink Code
#!/usr/bin/python # -*- coding:utf-8 -*- import sys import os import subprocess as sp from time import localtime, strftime import glob # OpenAI Adds import openai import time from datetime import datetime picdir = os.path.join(os.path.dirname(os.path.dirname(os.path.realpath(__file__))), 'pic') libdir = os.path.join(os.path.dirname(os.path.dirname(os.path.realpath(__file__))), 'lib') if os.path.exists(libdir): sys.path.append(libdir) import logging from waveshare_epd import epd2in13_V2 import time from PIL import Image,ImageDraw,ImageFont import traceback logging.basicConfig(level=logging.DEBUG) try: logging.info("epd2in13_V2 Demo") epd = epd2in13_V2.EPD() logging.info("init and Clear") epd.init(epd.FULL_UPDATE) epd.Clear(0xFF) while True:# Define fontsfont15 = ImageFont.truetype(os.path.join(picdir, 'Font.ttc'), 15)
font24 = ImageFont.truetype(os.path.join(picdir, 'Font.ttc'), 24)
font48 = ImageFont.truetype(os.path.join(picdir, 'Font.ttc'), 48)
image = Image.new('1', (epd.height, epd.width), 255) # 255: clear the frame# Get limerick from Lambdacurl_var = sp.getoutput("curl -s https://rx3[snip]ywp.lambda-url.us-east-1.on.aws/") draw = ImageDraw.Draw(image) # Draw outside border draw.rectangle([(0,0),(249,120)],outline = 0) draw.rectangle([(1,1),(248,119)],outline = 0) draw.rectangle([(2,2),(247,118)],outline = 0) draw.rectangle([(3,3),(246,117)],outline = 0) draw.rectangle([(4,4),(245,116)],outline = 0) # Draw limerick draw.text((10, -30), curl_var, font = font15, fill = 0) epd.display(epd.getbuffer(image)) time.sleep(30) except IOError as e: logging.info(e) except KeyboardInterrupt: logging.info("ctrl + c:") epd2in13_V2.epdconfig.module_exit() exit()
Auto-Startup
python3 /home/pi/e-Paper/Pi/python/examples/limerick.py > /dev/null 2>&1 &